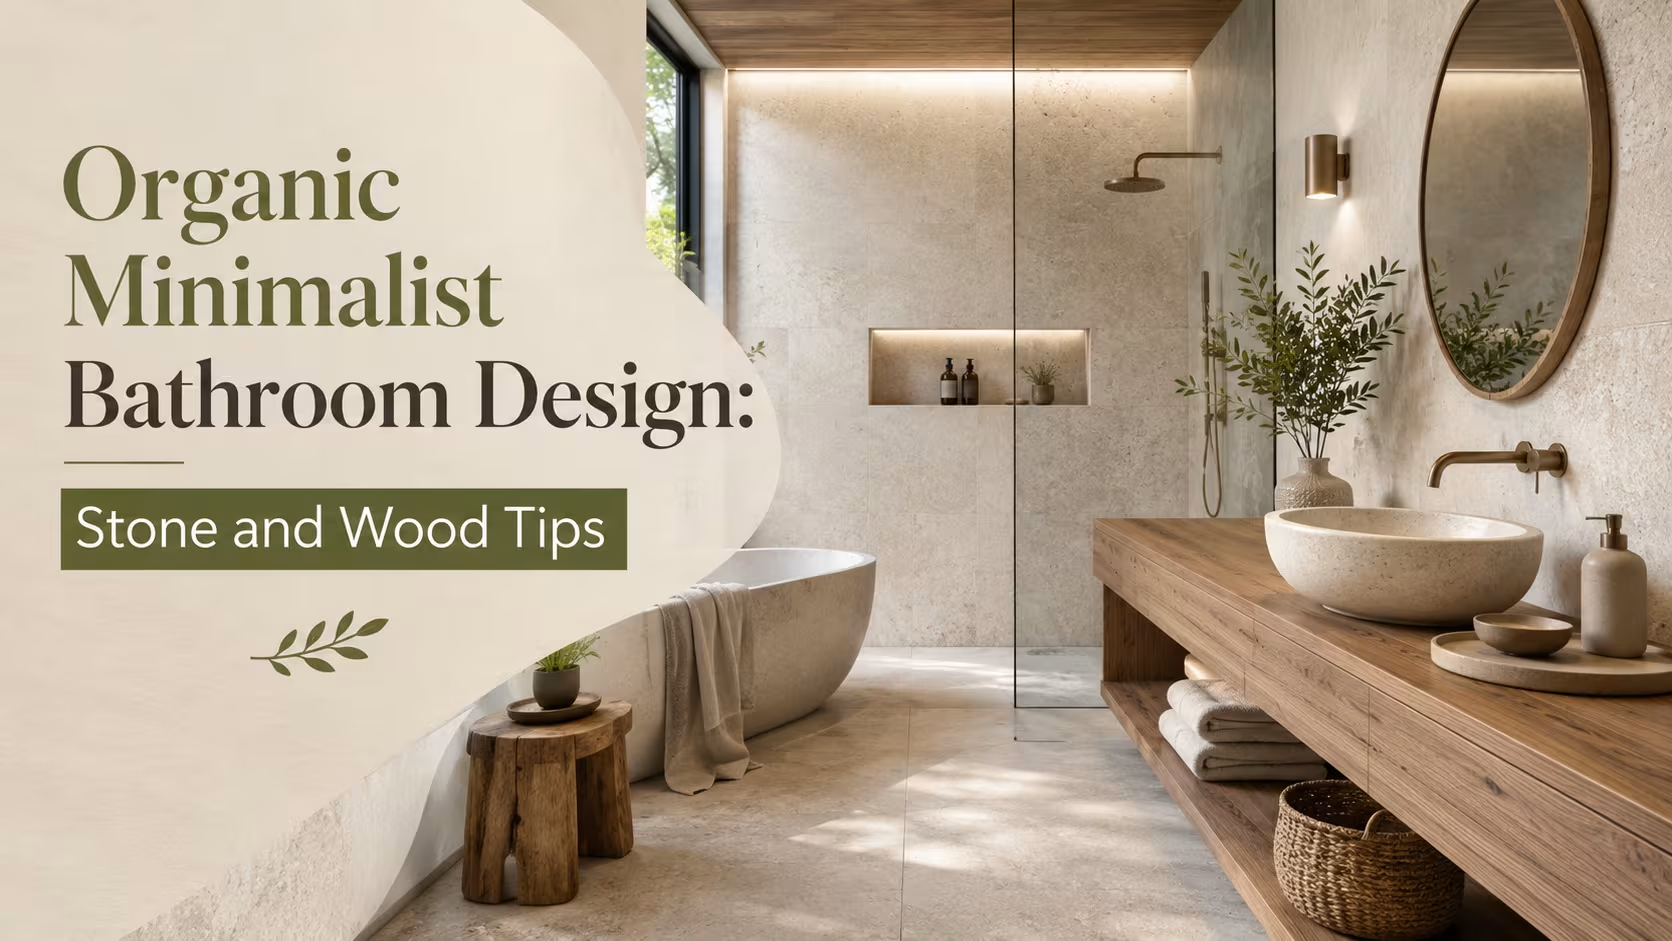
TL;DR
True organic minimalism balances raw natural materials with intentional open space to remove visual clutter. Mixing high-textured stone with warm wood grains creates a restorative room that feels inherently calm. Success relies on selecting moisture-resistant varieties, prioritizing tactile contrast, and letting the innate imperfections of the earth guide the layout.
Introduction
Can a utilitarian room truly change how you start your morning? Shifting a standard washroom toward an earthy material palette replaces bright synthetic glare with quiet natural grounding. This approach is not about leaving spaces empty, but rather filling them with intentional, unrefined textures that handle humidity gracefully. By understanding how stone and timber interact with moisture and light, you can build a highly practical space that offers genuine mental relief.
The Structural Core of Organic Minimalism
Minimalism often gets a bad reputation for feeling cold or resembling a stark hospital corridor. Introducing organic elements resolves this issue by replacing sterile white paint with rich, tactile depth. When you focus on the inherent character of timber and rock, you no longer need plastic accessories or decorative trinkets to make the room feel complete. The material itself becomes the ornament, keeping the visual weight low while maximizing the sensory experience.
Architects often refer to this balance as warm minimalism, where every surface serves a dual purpose of utility and comfort. A rough-cut travertine ledge holds your soap while offering a unique visual landscape every time the light shifts. This philosophy demands that you strip away the synthetic veneers and embrace the honest weight of authentic components. When done right, the room feels settled, permanent, and deeply tied to the natural world outside your window.
Balancing Visual Weight and Negative Space
Achieving equilibrium in a sparse layout means balancing heavy stone surfaces with lighter, airy zones. If you install a massive dark slate floor, the upper walls should remain light and breathing to avoid a cave-like atmosphere. A floating vanity configuration works wonders here by exposing the floor underneath and preventing the room from feeling cramped.
Selecting a Grounded Color Palette
Your color choices should mimic a walk through a coastal forest or a dry canyon. Think soft riverbed grays, pale sandy beiges, and the muted browns of oxidized oak. Avoid highly polished finishes that bounce harsh glare around the room, opting instead for matte, honed, or tumbled surfaces that absorb light softly.
Mastering the Harmony of Stone and Timber
The true magic happens where hard, cool rock meets the soft warmth of timber grains. These materials need each other to prevent the design from leaning too far into looking like a rustic log cabin or a chilly concrete bunker. For example, a sleek honed marble basin resting on a rough-hewn teak countertop creates an immediate point of interest without needing extra color.
In a recent renovation project in Portland, an old fiberglass shower unit was replaced with large-format limestone slabs. The space felt instantly elevated but slightly sterile until the design team introduced a custom cedar ceiling grid. The warmth of the cedar balanced the cool gray tones of the limestone, proving that tension between opposites creates a harmonious environment. This interaction teaches us that contrast is the secret to making simple spaces feel alive.
Selecting the Right Wood Species for Wet Environments
High humidity ruins standard interior woods quickly, making material selection critical. Teak, ipe, and western red cedar naturally resist water damage due to their dense grain and inherent oils. White oak is another excellent choice for vanities, provided it receives a high-quality matte sealer to block moisture without altering the natural look of the wood.
Implementing Textured Stone Finishes
Polished granite belongs in the past when it comes to creating a soothing oasis. Instead, seek out split-face stone, fluted marble, or tumbled travertine to introduce subtle shadows and depth. These varied textures catch ambient lighting beautifully, turning a simple wall into a shifting display of highlight and shadow throughout the day.
+---------------------------------------------------------+
|                  MATERIAL COMPATIBILITY                 |
+---------------------------------------------------------+
|  STONE TYPE       |  WOOD PAIRING   |  IDEAL PLACEMENT  |
+-------------------+-----------------+-------------------+
|  Honed Travertine |  Muted White Oak|  Vanity & Floors  |
|  Charcoal Slate   |  Reclaimed Teak |  Shower & Accents |
|  Carrera Marble   |  Walnut         |  Basins & Walls   |
+-------------------+-----------------+-------------------+
Designing the Focal Points
Every minimalist room needs a primary anchor point to draw the eye and establish the design language. In the bathroom, this anchor is typically the vanity wash station or the shower enclosure. By executing these areas with raw materials, you define the character of the entire room. A natural stone bathroom vanity serves as a magnificent centerpiece, especially when crafted with a thick mitered edge that showcases the continuous veining of the rock.
A common mistake is buying a mass-produced vanity cabinet and slapping a generic stone top on it. This looks disconnected and defeats the purpose of an organic design. A better solution involves engineering a custom cantilevered iron frame clad in thick timber boards, topped with a raw-edged stone vessel sink. This construction feels architectural, deliberate, and entirely custom, grounding the room with a sense of deliberate craftsmanship.
Transforming the Shower into a Natural Grotto
Replacing standard subway tile with a neutral slate tiling setup completely changes the showering experience. Using large slabs minimizes grout lines, creating a monolithic appearance that feels like a natural waterfall cliff. Ensure the stone installer seals the surfaces thoroughly to prevent mineral buildup from dulling the deep shades over time.
Crafting a Striking Raw Wood Accent Wall
Placing a raw wood accent wall directly behind a freestanding tub creates an instant sense of warmth. Use tongue-and-groove boards treated with a moisture-resistant, non-yellowing oil finish to keep the timber looking fresh. Position this feature wall away from direct water spray to ensure longevity while still reaping the visual benefits.
Tactical Details and Practical Execution
Transitioning from a conceptual mood board to a functional bathroom requires strict attention to waterproofing and maintenance. Wood expands and contracts with every hot shower, and porous stones absorb oils and hard water deposits if left unprotected. A beautiful design fails if it becomes a moldy nightmare within six months of completion.
During a cabin remodel in the mountains of Colorado, the homeowners insisted on using reclaimed barn wood for their shower surround. The construction crew advised against direct water exposure and instead used the weathered timber for a ceiling installation and a dry-zone accent wall. They opted for deep charcoal quartzite inside the wet curb, saving the client thousands in future mold remediation while retaining the rugged look.
Proper Sealing and Preservation Techniques
Never skimp on penetrating sealers for your stone elements, especially light limestones and marbles. Apply a high-quality water-based sealer at least once a year to keep water from seeping into the pores. For wood accents, marine-grade varnishes or specialized hardwax oils offer excellent defense against water rings without adding an artificial plastic shine.
Integrating Minimalist Concealed Plumbing
Visible chrome pipes and ornate faucets instantly break the illusion of an organic retreat. Opt for wall-mounted faucets in matte black, brushed nickel, or raw brass that patinas over time. Concealing the plumbing valves inside the wall keeps lines clean and allows the beauty of your stone backsplash to take center stage.
Illumination and Sensory Integration
The best material choices lose their impact under harsh, direct lighting. To make stone and wood come alive, you need soft, diffused illumination that mimics natural overcast daylight. Avoid placing a single bright downlight directly over the mirror, which casts deep shadows and flattens the texture of your walls.
Instead, embed hidden LED light strips behind a floating mirror or inside a recessed wall niche. This technique washes the raw stone with soft light, accentuating every ridge and grain pattern. If you have the luxury of natural light, frame your windows to look out onto greenery, blending the indoor materials with the outdoor landscape.
Choosing the Right Light Temperature
Cool blue lighting makes natural wood look sickly and stone look like industrial concrete. Stick to warm white bulbs between 2700K and 3000K to highlight the rich amber tones in oak and the creamy undertones of travertine. This temperature range mimics the golden hour, enhancing the overall calming effect of the room.
Selecting Tactile Hardware and Textiles
Complete the sensory experience by choosing accessories that match the organic theme. Replace fluffy synthetic towels with rough-textured linen wraps in oatmeal or charcoal shades. Choose cabinet hardware made of cast iron or tumbled bronze, ensuring every touchpoint feels substantive and connected to the earth.
Wrap Up
Creating an organic minimalist bathroom is about embracing the quiet power of authentic earth elements. By pairing the strength of natural stone with the inviting warmth of seasoned timber, you create a space that feels timeless and deeply restorative. Focus on rich textures, protect your surfaces from moisture, and keep clutter hidden away to let the materials speak for themselves. The result is a personal sanctuary that rewards your senses every single day.
FAQs Section
How do you prevent wood from rotting in a high-humidity bathroom?
Choose naturally water-resistant wood species like teak, cedar, or properly treated white oak. Apply a high-quality penetrating oil or marine sealer annually, and ensure your bathroom has a high-CFM exhaust fan to clear out moisture quickly.
Is natural stone difficult to clean and maintain in a shower?
Porous stone requires a penetrating sealer upon installation and a reapplication every twelve months to prevent staining. Avoid harsh acidic cleaners, opting instead for pH-neutral soaps that clean the stone without stripping its protective barrier.
Can you use real stone and wood in a small bathroom without making it look tiny?
Yes, by using large-format stone slabs to reduce grout lines and choosing lighter timber tones like white oak or ash. Floating the vanity and installing hidden LED lighting also creates the illusion of more floor space and an open atmosphere.
Disclaimer
This content shared by Fall Rugs is solely for research and informational purposes. Fall Rugs is not a professional interior design or home renovation consultancy, and the information provided should not be considered professional advice for home improvement or decor. All ideas and suggestions are based on current trends and general knowledge in the home decor industry.
![Human/ Act as a senior SEO content strategist, a semantic SEO authority, and a veteran editorial journalist with years of real publishing experience. Your writing must pass as the work of a domain expert who writes for other experts while remaining fully accessible to a curious new reader. The final article must meet Google AdSense content policies (no adult, no hate, no dangerous claims, no copyrighted material reproduced verbatim, no deceptive content). PRIMARY OBJECTIVE: Create a highly user-intended article that earns topical authority through semantic depth, lived‑experience insights, and a confident, natural prose rhythm. Search intent must be fully satisfied without any filler. Every sentence earns its place. Make sure you follow all the following structures. MANDATORY HEADING HIERARCHY Use exactly one H1. It must be the most compelling, idea‑rich headline. It must differ from the meta title. H2 headings must be clearly subordinate to H1 in visual weight. Under any H2, include 2 to 3 paragraphs depending on the subtopic’s complexity. Every paragraph's word count is natural (average 50–70 words). Avoid identical paragraph lengths in sequence. Use H3 sections where it helps break a subtle point into readable sub‑layers. H3 must be clearly smaller than H2. Never skip heading levels (no jumping from H2 to H4). Headings must use semantic variants of the core topic naturally. Do not stuff keywords. FORMAT RULES (GOOGLE ADSENSE COMPLIANT & HUMAN-EDITED LOOK) Use active voice sentences (80–90%) in the blog article. Write only in flowing paragraphs. Do not use bullet points, numbered lists, or any kind of table. Blog must include entities to rank in LLM. Make sure strictly do NOT use em dashes (—). Do not insert divider lines. Keep punctuation clean and natural like an editor. Readability should generally sit between 60 and 70 on the Flesch Reading Ease scale, but small deviations are acceptable when a complex point needs precise language. WORD COUNT & DEPTH Minimum 1700 words long. Expand using conceptual depth, relevant examples, and context. No words may be added just to inflate length. If the topic truly requires extended analysis, go up to 2400 words. Every paragraph must feel intentional. ADVANCED SEMANTIC SEO & ENTITY REQUIREMENTS Build the article around core entities, related entities, and their attributes. Search engines must perceive a knowledge graph‑level understanding. Naturally weave in LSI terms, co‑occurring phrases, and intent‑specific variations (informational, practical, comparative) without disturbing the narrative flow. Cover informational, implementation‑oriented, and contextual angles in a seamless order. Do not place any external links or reference citations in the article. The piece must stand on its own authority. Never keyword‑stuff. The main keyword’s frequency must feel invisible. NLP & GOOGLE HELPFUL CONTENT OPTIMIZATION Write for a curious, time‑pressed human. Show that you have made the mistakes, fixed them, and learned something worth sharing. Use sentence‑length variation: some lines short and punchy, others layered with careful reasoning. Favour contractions and everyday speech patterns where it feels natural, like a real copywriter. Stiff, over‑formal prose is a failure. Foreshadow questions a reader would ask, then answer them in a later paragraph. This creates an organic, non‑robotic flow. Must Include E-E-A-T SIGNALS (MUST BE EMBEDDED, NOT DECLARED) Write with the quiet confidence of someone who has spent years in the subject. State observations that cannot be found on generic summary pages. Explain why a method works, what the second‑order effects are, and when it fails. No mention of gambling, adult themes, weapons, unsubstantiated health claims, or anything outside standard informational/safe commercial topics. Must include one or two realistic, concrete examples (not hypothetical “imagine you” starters; use real‑world scenario descriptions like a case reporter). Names can be fictionalised, but the scenario must feel true. Reference broad industry patterns without naming specific sources or linking out; the knowledge must appear to live inside the author’s head through experience. LAST INSTRUCTIONS / DO NOTS DO NOT produce content that is defamatory, illegal, or that violates Google and Google AdSense platform policies. DO NOT present the prompt itself to readers; keep this instruction set internal. Do not include meta phrases or AI-style conclusions (e.g., "Certainly", "Here’s the article"). DO NOT put the reference source links and mentions in the Article, The links and posts which you use as source to generate the article (Strict). Deliver only the article content without self-references (Strict). EXTENDED BANNED PHRASES & AI FINGERPRINT LIST (Strictly DO NOT USE ANY OF THESE) Intro/Starting: Discover, Explore, In today’s digital world, Understanding, Hands on, In this article we will discuss; let's dive in; let's explore; this article will cover, In this guide, In recent years, Nowadays, Over the years. Robotic transitions/connectors (when used as crutches at the start of multiple sentences in a row): learn, Moreover, Furthermore, Additionally, However, Therefore, As a result, In conclusion, To sum up, Overall. (Fine to use sparingly and organically, but never stack them.) Overused AI style words: Ultimate, Essential, Comprehensive, Complete guide, Step‑by‑step, Proven, Effective, Powerful, Best practices, Key benefits, Key features. Overused SEO/blog scaffolds: You need to know, Everything you need to know, Must know, Top reasons, Top benefits, Top tips, Best ways, Simple ways, Easy methods, Quick tips. Generic explanation padding: It is important to note, Keep in mind, Make sure to, You should, One of the best ways, The main reason is, The key factor, The most important thing. Ending/Conclusion clichés: In summary, To wrap up, Final thoughts, At the end of the day, We hope this article helps, Hopefully this guide. AI‑typical sentence patterns: Whether you are a beginner or expert, No matter your experience level, From beginners to professionals, This makes it easier, This helps you to, This allows you to. Fluffy filler: Basically, Simply put, Generally speaking, In simple terms, Needless to say, Clearly, Obviously. AI marketing hype: Game‑changer, Next‑level, Cutting‑edge, Revolutionary, Boost your, Skyrocket, Maximize, Unlock. Extra AI fingerprints: Let’s take a look, Here’s what you need to know, Here are some tips, Let’s break it down, Let’s get started, Without further ado, That being said, It goes without saying, In a nutshell, All things considered. Meta‑phrases in the output: “Certainly,” “Here’s the article,” any self‑reference to the fact that you are an AI. The reader must never suspect a machine is behind the words. elve, navigate (the world of / the landscape of), leverage (as a verb for “use”), underscores (e.g., “This underscores the importance of”), pivotal, realm (e.g., “within the realm of marketing”), robust (when talking about features, solutions, strategies), seamless / seamlessly, foster (e.g., “foster a sense of community”), streamline, synergy / synergistic, actionable (e.g., “actionable insights”), granular (e.g., “granular control”), holistic, testament (e.g., “a testament to the quality of”), adhere to (instead of “follow”), facilitate, elevate (your skills / your work), harness (e.g., “harness the power of”), resonate (with your audience). ARTICLE STRUCTURE (EXACT SEQUENCE) METADATA SECTION (WRITE FIRST, INTERNAL ONLY) Main Keyword: Secondary Keywords: Meta Title (55–61 characters, high click‑intent): Meta Description (150–160 characters, promise a unique insight): SEO URL Slug (short, keyword‑rich): Image Alt Text (descriptive, entity‑aware): H1: (Different from Meta Title, crafted to spark curiosity) ##TL;DR A clear TL;DR (Too Long; Didn’t Read) summary in 2–3 concise sentences. Focus only on the main idea and key points. Avoid extra details, examples, or repetition. Keep it simple and easy to understand. ##Introduction An engaging introduction (3–5 sentences) for a blog post. Start with a hook or question, clearly introduce the topic, and explain what the reader will learn or gain. Keep the tone simple, clear, and reader-friendly. Main Body (H2 and H3 Structure) Write a comprehensive main body for a blog post on the following topic using proper H2 and H3 headings. Organize the content into logical sections. Under each heading, provide clear explanations, actionable tips, and must-be-relevant examples. Use simple language and short paragraphs, and make the content SEO-friendly and easy to scan. ##Wrap Up: A short, clear, and concise closing (3–4 sentences) for the following topic. Summarise the key points, restate the main idea, and give a final takeaway or advice. Keep it simple, engaging, and reader-friendly. ##FAQs Section: Create exactly 3 SEO-friendly FAQs for the following topic. The questions should reflect real user search intent and be highly relevant and highly searched. Write clear, helpful, and authentic answers (1–2 sentences each). Keep the language simple and informative. In this article write disclaimer same as is it, make sure, dont changing, Disclaimer: This content shared by Fall Rugs is solely for research and informational purposes. Fall Rugs is not a professional interior design or home renovation consultancy, and the information provided should not be considered professional advice for home improvement or decor. All ideas and suggestions are based on current trends and general knowledge in the home decor industry. ============ OUTPUT FORMATTING (STRICT) Return the entire article in proper Markdown format. - Use # for H1 - Use ## for H2 - Use ### for H3 - Make important phrases bold using **bold** - Separate paragraphs with proper spacing - Do not return plain text - Do not describe formatting – apply it directly The final output must look like a fully formatted published blog post. Here is my topic [Small Studio Layouts That Live Much Bigger Than They Are] These ideas must be with proper numbering Deliver only the finished article with no self-referential phrases like “Now I will write…” or “Here is the article.” The final output must look exactly like a published page. And everything must be well formatted.](https://fallrugs.com/wp-content/uploads/Dining-Room-Ideas-That-Set-a-Modern-Mood-Without-Feeling-Cold-768x438.avif)