TL;DR
Vaulted ceilings create dramatic architectural impact, but standard pot light rules don’t apply to sloped surfaces. Proper fixture selection, angle adjustment, and spacing strategy make the difference between a ceiling that glows beautifully and one that wastes electricity on illuminated beams. These seven ideas address the real problems installers and homeowners face.
Introduction
A vaulted ceiling should feel like an asset. Too often, it becomes a lighting puzzle that nobody warned the homeowner about before the drywall went up. Pot lights that look perfect on a flat ceiling behave completely differently once they’re tilted along a slope, and the consequences range from harsh glare at eye level to entire sections of the room sitting in shadow.
Getting recessed lighting right on a cathedral or angled ceiling takes more than buying the correct fixture. It takes thinking about the ceiling as a light-distribution surface, not just a place to install hardware.
Why Standard Recessed Lighting Logic Breaks Down on Sloped Ceilings
Flat-ceiling recessed lighting follows a straightforward formula: divide the ceiling height in half, space fixtures that distance apart, and work outward from the center. It’s a formula that has served contractors well for decades. Apply it to a vaulted ceiling and the result is almost always disappointing.
The fundamental problem is beam angle. A recessed fixture sitting in a flat ceiling sends light straight down, toward the floor where people and furniture actually are. The same fixture installed in a sloped ceiling sends its beam toward the opposite wall or at a diagonal across the room, depending on where along the vault it sits. Without an adjustable gimbal or a purpose-built sloped-ceiling trim, the light lands in the wrong place and the eye catches the bare bulb instead of the illuminated surface.
There’s also a structural consideration that gets overlooked during planning. Vaulted ceilings often have less attic or plenum space above the slope than a standard ceiling does, which limits the depth of housing a contractor can use. This is the kind of detail that causes expensive rework when it’s discovered mid-installation rather than during the design phase.
Idea 1: Use Adjustable Gimbal Fixtures Specifically Rated for Slope
The single most important product decision for a vaulted ceiling is the fixture type. Adjustable gimbal recessed lights are designed so the inner trim ring rotates independently from the housing, which means the light beam can be redirected downward regardless of the ceiling’s pitch. A standard fixed trim installed on a 45-degree slope will point diagonally across the room. A gimbal on the same slope can be rotated to send light straight down to a reading chair or a kitchen counter.
Look for fixtures labeled with a slope rating, which is usually expressed in degrees. A ceiling with a 4-in-12 pitch sits at roughly 18 degrees, while a steep cathedral vault at 12-in-12 hits 45 degrees. Most residential gimbal fixtures accommodate slopes up to 45 degrees, but steeper vaults require specialty units. Confirming the slope rating before purchase prevents a mismatch that no amount of installation skill can fix.
The visual difference between a properly aimed gimbal and a fixed trim on a slope is immediate. The gimbal allows the aperture to sit flush and even across the ceiling plane, which reads cleanly from below, while the tilted trim ring of a fixed fixture creates an uneven visual rhythm that experienced eyes find immediately distracting.
Idea 2: Place Fixtures Along the Lower Third of the Vault for Living Zones
Where along the slope a fixture sits matters as much as what kind of fixture it is. A common mistake is distributing pot lights evenly from the ridge down to the knee wall, treating the slope like a flat ceiling that happens to be tilted. The result is that fixtures near the peak illuminate the upper portion of the opposite wall while the seating areas below remain dim.
Concentrating fixtures in the lower third of the vault brings the light source closer to the occupied zone of the room. It reduces the throw distance the beam has to travel before reaching a work surface or a face, which improves both efficiency and quality of light. It also keeps the upper vault visually clean, which lets the architecture of the ceiling read without interruption.
A residential project in suburban Toronto demonstrates this well. The homeowner had nine recessed lights installed across a full cathedral vault in their great room by a contractor who spaced them uniformly. The upper lights lit the built-in bookshelves on the far wall beautifully, but the sectional sofa sat in noticeably softer light. When three additional gimbals were added along the lower third of the vault and aimed at the seating group, the room balanced immediately. The original nine fixtures weren’t removed; they became accent lighting for the wall. The positioning of the new ones did the functional work.
Idea 3: Layer Ambient and Accent Functions Intentionally
Vaulted ceilings invite layered lighting because the vertical space creates room for light at different elevations to do different jobs. Treating all the pot lights as ambient sources and expecting them to handle every function produces a flat, overlit result that works against the drama the ceiling is meant to create.
Ambient pot lights along the lower slope handle general illumination. A separate row of fixtures positioned higher on the vault, aimed toward the ridge or the upper wall, creates wash lighting that makes the ceiling surface visible and gives the room a sense of height. When these two layers are on separate dimmer circuits, the homeowner can dial in atmosphere for a dinner party or full brightness for cleaning, without touching the architecture of the light.
Accent lighting using pot lights is also worth considering for vaulted spaces that include built-in shelving, a fireplace surround, or an exposed beam structure. Narrow-beam adjustable fixtures aimed at these elements from across the vault create depth and shadow that a flat ceiling could never produce. The vault becomes a stage for the room rather than just a tall version of ordinary ceiling.
Idea 4: Factor in Beam Angle When Calculating Spacing
Spacing recessed lights on a flat ceiling is a geometry problem with a predictable answer. Spacing them on a slope is a geometry problem where the variables keep changing as you move up or down the pitch, and most online calculators don’t account for that.
A narrow beam angle of around 25 degrees concentrates light but creates a smaller pool at the floor level, requiring more fixtures or closer spacing to avoid dark spots between them. A wide beam angle of 60 degrees or more spreads light broadly but loses intensity quickly, which matters more on a steep vault where the fixture is farther from the floor than it would be on a flat eight-foot ceiling.
For most vaulted living spaces, fixtures with a 38-to-45-degree beam angle hit a practical middle ground. They spread enough to reduce the hot-spot effect while maintaining enough intensity to reach the floor from a fifteen-foot ridge. Testing a single fixture before committing to a layout is underrated as a design step. A simple clip-on test light pointed from the intended fixture location tells a room’s story faster than any specification sheet.
Idea 5: Choose the Right Color Temperature for the Height
Color temperature affects perception of space, and vaulted ceilings amplify that effect because there is more ceiling surface in view than in a standard room. Warm white light in the 2700K to 3000K range makes a tall space feel inhabited and grounded. Cooler temperatures above 4000K, which work well in task-heavy kitchens and offices, tend to feel clinical in a large-volume space and can make the ceiling feel farther away rather than architecturally interesting.
This isn’t a hard rule. A contemporary home with concrete finishes, steel beams, and a deliberate industrial character might carry 3500K to 4000K without issue. The surrounding palette, finish temperature, and intended use of the room all influence whether warmth or neutrality reads better. What consistently fails is mixing color temperatures in the same vaulted space without a clear reason. Warm gimbals in the lower third paired with cool accent lights higher on the slope creates a visible discontinuity that the eye senses before the brain names it.
Selecting a CRI of 90 or above matters especially on vaulted ceilings with painted surfaces. At lower CRI values, subtle colors in plaster, wood, and upholstery lose saturation in ways that make an expensive room look budget. High-CRI LEDs have become standard at most price points, but it’s worth confirming before purchase rather than assuming.
Idea 6: Plan the Electrical Rough-In Before the Drywall
Vaulted ceiling pot light projects go wrong most often not during the fixture selection phase but during the rough-in phase, when decisions made quickly during framing create permanent limitations. Junction box placement on a slope requires offset bar hangers or remodel housings that can be positioned precisely, and if the boxes end up in the wrong location relative to the pitch, no amount of adjustable trim will fix the geometry.
The rough-in stage is also when wire routing needs to be solved, because a vaulted ceiling frequently has no attic access above it. Installers sometimes need to run conduit along the surface of the ceiling or route wires through the peak where a small service chase can be created. In retrofit situations, fishing wire through an insulated sloped ceiling is genuinely difficult and can require opening drywall in places the homeowner didn’t anticipate.
A contractor working on a new build in British Columbia described the approach his company uses on every vaulted ceiling project: they install all junction boxes before insulation, confirm every location with a laser level from the floor looking up, and photograph the entire rough-in before the insulation crew arrives. That photo record has prevented costly mistakes more than once when a homeowner changed their furniture layout between rough-in and trim-out.
Idea 7: Use Dimmers and Smart Controls Matched to the Fixture’s Driver
LED dimming on a vaulted ceiling is a different problem than LED dimming on a flat ceiling, not because the physics change, but because vaulted spaces are typically larger and often drive more fixtures on a single circuit. Overloaded dimmer switches are one of the most common causes of LED flicker, buzzing, and premature driver failure, and the problem scales with the number of fixtures.
Match the dimmer’s wattage rating to the actual load on the circuit with meaningful headroom, not at its limit. A dimmer rated for 150 watts carrying 140 watts of LED load will work initially but generates heat that shortens the dimmer’s life. Sizing up to a 300-watt or 600-watt unit for the same 140-watt load costs very little more and extends the system’s reliable life considerably.
Smart dimmer systems that use trailing-edge (electronic low-voltage) dimming technology handle the power curve of modern LED drivers better than leading-edge dimmers designed for incandescent loads. If the fixture manufacturer specifies compatible dimmer brands in their documentation, that list is worth following. The combination of a quality LED driver and a properly matched dimmer produces smooth, flicker-free dimming from full brightness down to around five percent, which is exactly the kind of atmospheric control a vaulted ceiling space rewards.
How Exposed Beams and Pot Lights Can Coexist
Integrating Lighting Between Beam Bays
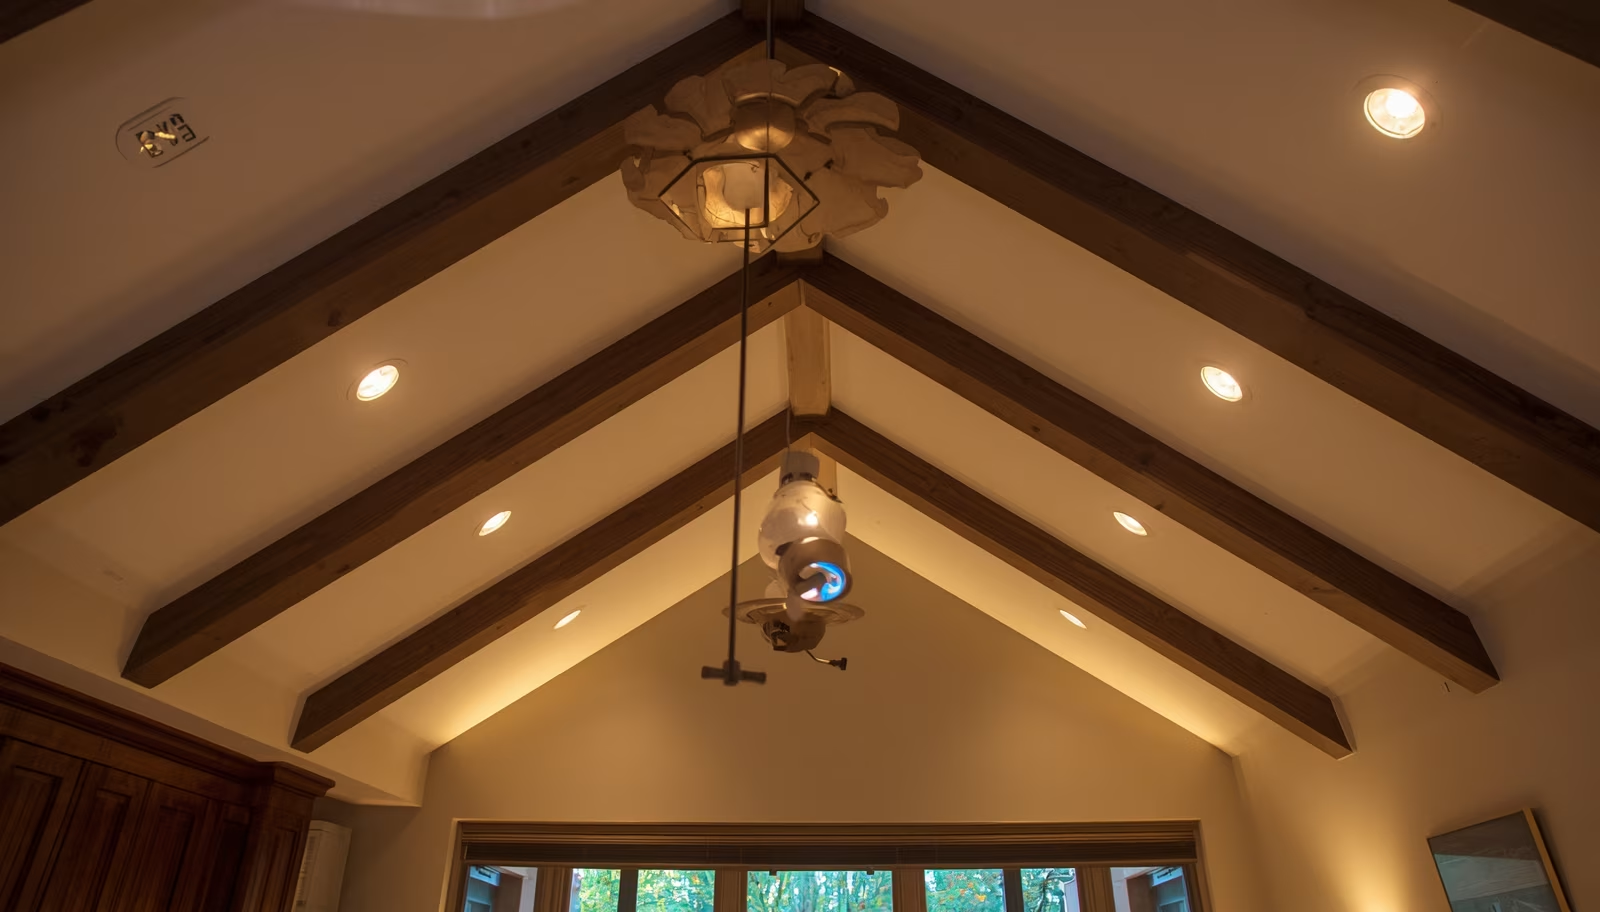
Vaulted ceilings with exposed timber or engineered beams present a specific challenge because the beams divide the slope into bays. Pot lights placed without reference to the beam layout can end up partially obscured by a beam edge or visually misaligned with the bay’s center, which looks like a planning error even when the lighting itself works fine.
Laying out fixture locations in relation to the bay centers, rather than from the walls inward, produces a visually organized result. In a room with three beam bays, one or two fixtures centered in each bay reads as deliberate. Random placement across the beam structure reads as accidental.
Avoiding Shadow Lines Across the Slope
Beams that project significantly below the ceiling plane cast shadows when recessed lights nearby are aimed downward along the slope. Placing fixtures at least twelve to eighteen inches away from beam faces, on the down-slope side, reduces the likelihood of a hard shadow line cutting across the ceiling surface. This is one of those details that photographs never capture but that anyone who spends time in the room will notice continuously.
Wrap Up
Vaulted ceiling pot lights reward careful planning and penalize shortcuts more than almost any other residential lighting project. The slope changes every variable that flat-ceiling experience makes familiar, from fixture type to spacing math to dimmer compatibility. Getting the rough-in right, choosing adjustable gimbals rated for the actual pitch, and layering functions across separate circuits turns a dramatic architectural feature into a room that feels considered at every moment of the day. The ceiling does the visual work, and the lighting lets it.
FAQs
Can you use regular pot lights on a vaulted ceiling?
Standard fixed recessed lights are not designed for sloped surfaces and will direct light at an angle rather than downward, causing glare and poor coverage. Adjustable gimbal fixtures with a slope rating matching your ceiling’s pitch are the correct choice.
How far apart should pot lights be on a vaulted ceiling?
Spacing depends on the fixture’s beam angle, the ceiling height at the point of installation, and the room’s function, but a practical starting point is every four to six feet along the lower portion of the slope for living areas. Testing a single fixture first confirms whether the beam spread matches your spacing plan.
Do vaulted ceiling pot lights need special wiring?
The wiring itself is standard, but the routing path is more complex because most vaulted ceilings have no attic access above them. Rough-in planning and box placement need to happen before insulation and drywall to avoid costly retrofit work later.
Disclaimer
This content shared by Fall Rugs is solely for research and informational purposes. Fall Rugs is not a professional interior design or home renovation consultancy, and the information provided should not be considered professional advice for home improvement or decor. All ideas and suggestions are based on current trends and general knowledge in the home decor industry.