TL;DR
A well-executed media center transforms an ordinary living space into a refined entertainment environment. Integrating thoughtful materials, proper acoustic planning, and hidden wire management integrates the equipment without overwhelming the existing architecture. Careful attention to ambient illumination ensures a comfortable viewing experience while maintaining a stylish aesthetic.
Introduction
Designing a focal point around a large blank screen presents a unique interior challenge for homeowners. We often struggle with making heavy electronic equipment blend into a carefully curated living space without feeling sterile or chaotic. You will learn practical ways to integrate screens using strategic textures, custom storage framing, and intelligent lighting setups. These concepts help balance functionality with visual appeal in any room.
The Foundation of Media Center Aesthetics
Addressing a focal point requires acknowledging the dominant nature of large electronic displays. When the screen powers down, it leaves a massive dark void that can easily overpower the room dynamics. To counter this heavy visual weight, decorators apply contrasting textures and careful proportions right on the mounting surface. Proper planning prevents the technology from acting like a black hole absorbing all the light in the room.
Many homeowners mistakenly mount screens too high or surround them with cluttered decor. A thoughtful approach grounds the equipment using purposeful geometry. By creating distinct zones for the display and its supporting peripherals, the entire elevation feels intentional rather than haphazardly arranged. Visual balance happens when the physical size of the supporting furniture directly correlates to the diagonal width of the screen.
We achieve the best results by treating the drywall as a cohesive architectural element. Planning the exact placement of studs, power outlets, and data ports before installing finishes saves countless hours of frustration. Pulling thick cords through tight wall cavities after the paint dries is a nightmare you want to avoid completely.
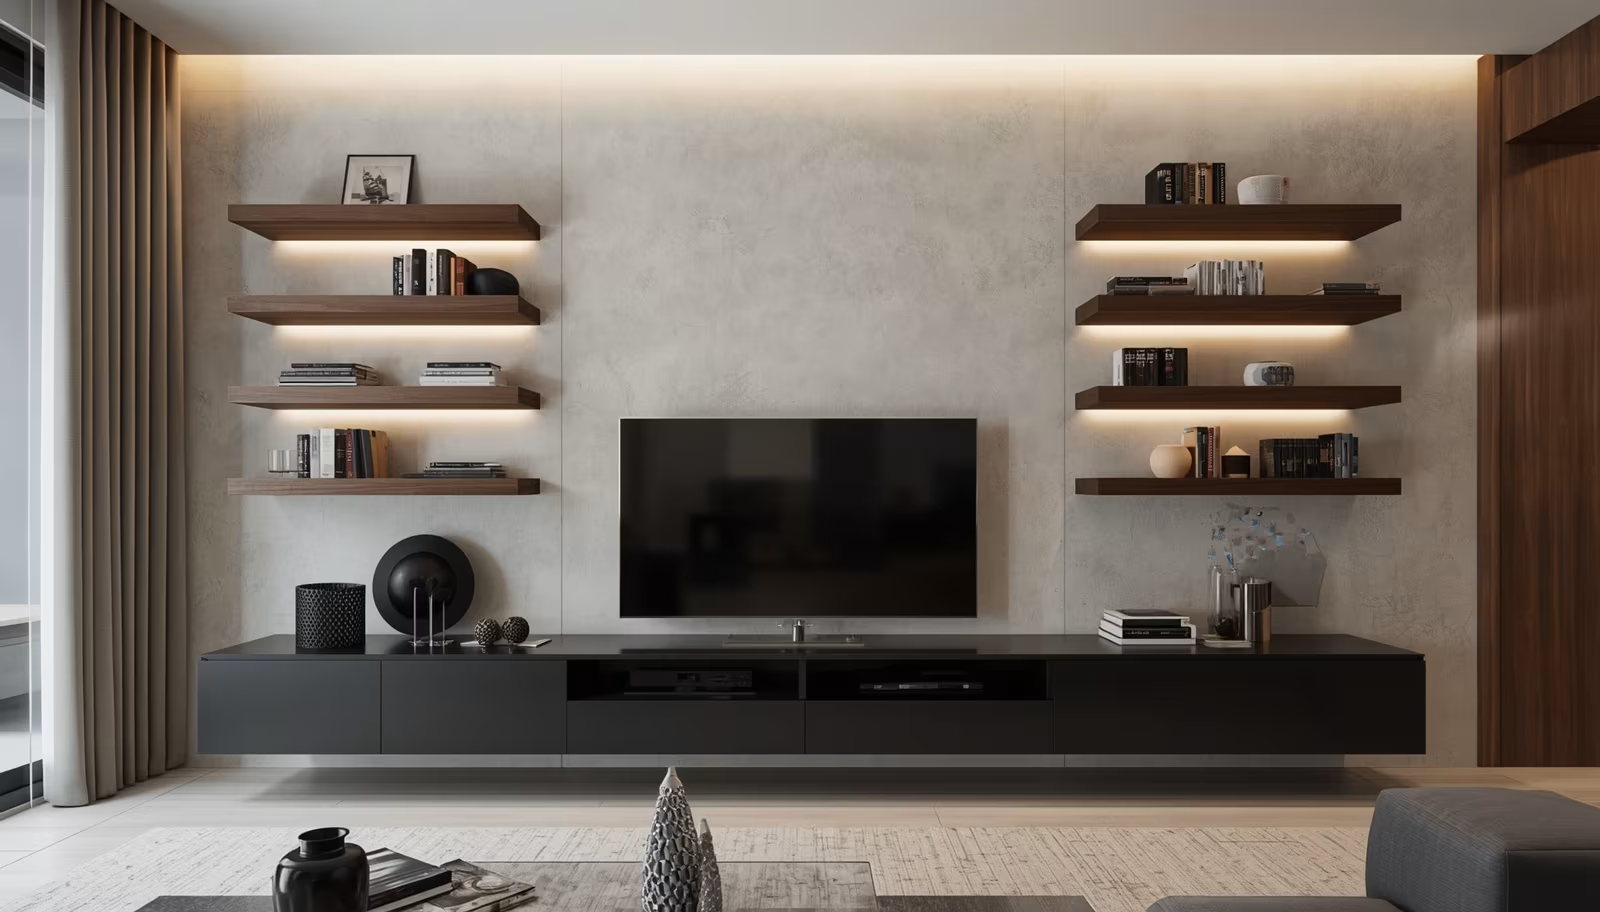
Idea One: The Minimalist Floating Console Approach
Suspended cabinetry creates an illusion of extra floor space while hiding bulky cable boxes and gaming consoles. By attaching a streamlined wooden or matte lacquer unit directly to the drywall, the room gains a lighter, unburdened atmosphere. You maintain easy access for vacuuming underneath while establishing a highly contemporary silhouette. This approach makes small urban apartments feel significantly larger.
Floating units demand rigorous structural support during installation. We always verify the load-bearing capacity of the vertical framing members before hanging heavy solid oak pieces. Lag bolts must penetrate the wooden studs dead center to prevent the entire structure from ripping out of the sheetrock under the weight of heavy amplifiers. It takes patience to map out the framing correctly.
Routing the high-definition media cords and power cables through an in-wall conduit keeps the gap between the screen and the console completely pristine. Installing a recessed plastic pipe between the screen bracket and the cabinet interior creates a hidden highway for your electronics. This lets you swap out old gaming systems without tearing apart the pristine walls.
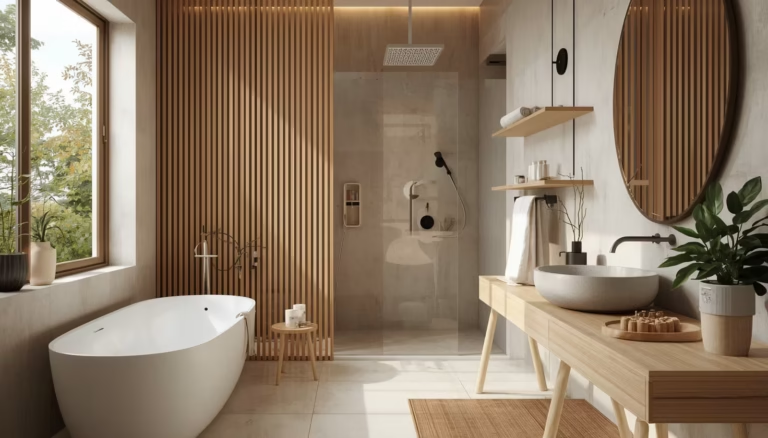
Idea Two: Dark Slatted Wood Backgrounds
Vertical wood paneling painted in deep charcoal or rich walnut stains camouflages the dark rectangle of the display when turned off. The repetitive vertical lines draw the eye upward, giving standard ceiling heights a much taller appearance. This texture adds a layer of warmth that flat white paint simply cannot provide. The organic grain of natural timber softens the rigid plastic bezels of modern televisions.
Placing a black screen against a dark, textured background reduces the jarring contrast typical of standard room layouts. The shadows created by the deep slats trick the brain, blurring the sharp edges of the electronic device into the surrounding architecture. You stop seeing a massive gadget and start seeing a textured architectural installation.
The gaps between the wooden slats also offer clever opportunities to hide thin wiring or mount small satellite audio components. We frequently wedge ultra-thin speaker wire right into the shadowy recesses of the paneling. This method merges the organic feel of nature with rigid technological requirements beautifully.
Spatial Planning and Visual Weight
Integrating a massive display requires careful attention to the surrounding negative space. If you push the screen into a tight corner or crowd it with tall bookshelves, the area feels claustrophobic. Providing ample breathing room around the edges allows the eyes to rest during intense movie scenes or extended gaming sessions. White space acts as a necessary visual buffer.
Scaling the surrounding furniture to match the television size is absolutely critical for room harmony. A massive organic LED display dwarfs a tiny media stand, creating a top-heavy layout that feels unstable and anxious. We specify consoles and built-in units that extend at least eight to twelve inches past the left and right edges of the screen for proper grounding.
Balance also applies to the vertical axis. Finding the correct eye level prevents neck strain and dictates where custom shelving should start and stop. The center of the screen should sit roughly forty-two inches off the floor for standard sofa heights. Hanging a display near the ceiling mimics a sports bar, totally ruining the cozy residential feeling you want to cultivate.
Idea Three: Asymmetrical Shelving Integration
Offsetting the display to one side while balancing it with heavy, staggered shelves on the opposite side creates dynamic visual interest. Rather than centering the equipment perfectly, this layout mimics contemporary art galleries. You can fill the open cubbies with curated ceramics, hardback books, or cascading trailing plants. It feels deliberate and artistic.
The trick to making asymmetry work lies in visual weight distribution. A cluster of dark, heavy objects on the left shelf perfectly counteracts a large screen placed on the right. This layout demands careful planning to ensure the overall composition does not feel lopsided. We often mock up the arrangement using painter’s tape to gauge the visual gravity before drilling any holes.
Asymmetry works wonders in awkwardly shaped rooms where perfect centering is impossible due to doorways or windows. By leaning into the off-center placement, you turn an architectural defect into a design feature. It forces the eye to scan the entire width of the space rather than fixating strictly on the glowing monitor.
Idea Four: Floor to Ceiling Natural Slabs
Installing large format porcelain or natural stone slabs instantly communicates luxury and permanence. The subtle veining in a highly polished natural finish provides organic movement behind rigid geometric screens. This application turns a simple viewing area into an opulent architectural statement piece. The sheer mass of the stone commands attention instantly.
Working with heavy masonry requires specialized mounting hardware to prevent cracking the delicate surface during installation. We collaborate closely with stone fabricators to pre-drill anchor points for the bracket and cut precision access holes for power management. You only get one chance to cut into an expensive piece of imported marble, so the blueprint must be flawless.
The reflective nature of polished stone also means you must carefully manage room lighting to prevent harsh glare. Matte finishes on porcelain tiles offer a similar high-end aesthetic without turning the wall into a massive mirror. We prefer honed finishes when dealing with rooms that receive heavy afternoon sunlight.
Technical Considerations for Functional Spaces
Creating a beautiful focal point means absolutely nothing if the electronics fail to function correctly. Heat management often goes completely ignored during the planning phases of tight custom cabinetry. Receivers, video processors, and network routers require constant airflow to prevent thermal throttling and premature hardware death. Trapped heat melts delicate internal solders.
Installing silent ventilation fans inside closed cabinets pulls cool air from the base and exhausts warm air out the top. We incorporate discreet louvered doors or perforated metal grilles to allow infrared remote signals to pass through while hiding the blinking indicator lights. Proper cable management paths ensure you can swap out broken components without tearing the entire structure apart.
A dedicated conduit pipe buried behind the drywall acts as a future-proof highway for changing technology. Running a smooth two-inch pipe from the display area down to the equipment base lets you easily pull new high-speed data cords later. Technology changes rapidly, and your custom built-in needs to adapt without requiring a demolition crew.
Idea Five: Recessed Niche Mounting
Building a custom alcove into the framing allows the screen to sit entirely flush with the surrounding drywall. This technique removes the bulky side profile of the electronics entirely, creating a sleek, integrated look that resembles a framed picture. The resulting flat surface prevents the equipment from encroaching into tight walking paths in narrow living rooms.
Recessing requires stealing physical depth from the adjacent room or building out a false partition entirely. We frame the opening approximately one inch larger than the display dimensions on all sides to allow for adequate ventilation and future size upgrades. Leaving breathing room prevents the internal components from overheating during summer months.
An articulating mount installed inside the cavity lets you pull the unit out for easy rear access when plugging in new devices. Once the connections are made, you simply push the screen back into its designated pocket. It provides a flawlessly flat facade while retaining full serviceability for the homeowner.
Idea Six: Concealed Behind Custom Cabinetry
Hiding the technology completely offers the most refined solution for formal sitting rooms and library spaces. Installing motorized sliding panels or custom bi-fold doors conceals the massive black rectangle when company arrives. The room immediately transforms back into a conversation-focused space rather than a designated media consumption theater. Out of sight means out of mind.
Motorized tracks require careful calibration to ensure smooth operation without catching on the delicate glass edges. Using artwork printed on stretched canvas for the sliding panels serves a dual purpose by absorbing sound and providing visual beauty. This method perfectly bridges the gap between traditional interior decoration and modern entertainment needs.
Manual sliding barn doors offer a mechanical, rustic alternative to expensive motorized systems. Heavy iron tracks and salvaged wood planks slide effortlessly to reveal the screen on movie nights. The tactile act of physically opening the doors acts as a ritual, signaling the start of family relaxation time.
Mastering Ambient Illumination Around Screens
Lighting plays a massive role in how we perceive color and contrast on a digital display. Watching a bright screen in a pitch-black room forces the pupils to constantly dilate and constrict, causing rapid eye fatigue and tension headaches. Introducing subtle illumination behind the equipment softens this harsh transition and dramatically improves the perceived black levels of the picture.
Bias lighting involves placing a soft, neutral white light source directly behind the monitor, washing the surface behind it. This gentle glow tricks the brain into seeing deeper, richer contrasts on the display itself. We avoid using colored light strips for critical viewing areas, as extreme blues or reds distort the color accuracy of the director’s intended vision.
Reflections from table lamps and overhead fixtures ruin the viewing experience faster than anything else. Placing sconces on dimmer switches and using opaque lamp shades controls light spillage across the sensitive glass surface. Managing the photon scatter keeps the picture crisp and legible from every seating position.
Idea Seven: Integrated Rear Bias Illumination
Recessing high-quality light tape into the back edge of a floating console or directly onto the mounting bracket provides instant ambient relief. The light must bounce off a neutral-colored surface to work effectively. We select strips with high color rendering indexes to ensure the glow feels natural and pleasing to the human eye.
Hiding the actual diodes is critical for a polished, professional outcome. Seeing the individual bright dots of a cheap light strip instantly cheapens the custom installation. We use extruded aluminum channels fitted with frosted polycarbonate diffusers to create a smooth, continuous wash of soft illumination that looks highly intentional.
Hardwiring these low-voltage systems into the main room lighting switch creates a unified experience. When you dim the main overhead lights, the bias lighting automatically turns on. This integrated approach removes the hassle of hunting for separate remote controls just to manage the background brightness.
Idea Eight: Natural Light Mitigation
Controlling the sun often dictates exactly where the equipment can live in a specific floor plan. South-facing windows cast harsh afternoon rays directly across sensitive glass, making daytime viewing completely impossible without heavy drapes. We analyze the light paths throughout the entire day before committing to a final permanent mounting location.
Integrating motorized blackout shades into the home automation system solves daytime glare issues effortlessly. When the projector or display powers on, the shades automatically lower to create the perfect dark theater environment. It feels like magic when the room adjusts itself for movie time.
Pairing these heavy light-blocking treatments with light sheer curtains maintains daytime privacy while cutting down the intensity of direct sunbeams. You get the benefit of soft natural light for reading without suffering through blinding reflections during afternoon sports broadcasts.
Material Textures and Acoustic Treatments
Hard surfaces bounce sound waves violently around a room, creating muddy dialogue and harsh irritating echoes. While stone and glass look spectacular visually, they actively destroy the audio clarity of expensive soundbars and home theater speakers. Mixing soft, absorptive materials into the design layout drastically improves the actual listening experience.
Acoustic engineering does not have to look like a messy recording studio control room. Modern sound-absorbing panels come wrapped in beautiful linens, heavy wools, and microsuede fabrics that look exactly like high-end art pieces. Placing these soft elements strategically opposite the primary speakers tames the aggressive high frequencies instantly.
Balancing heavy masonry with warm textiles creates a room that feels both luxurious and sonically comfortable. A custom wool rug, thick velvet curtains, and plush upholstered furniture all contribute to softening the audio reflections. Sound requires as much design attention as physical furniture.
Idea Nine: Fabric Wrapped Acoustic Geometry
Creating a feature layout using padded geometric shapes solves both visual and auditory challenges simultaneously. Hexagonal or rectangular panels wrapped in textured fabrics can be arranged in custom mosaic patterns right behind the media center. They absorb errant sound waves while adding a distinct, tactile softness to the hard edges of the electronics.
We often specify these panels in varying thicknesses to create a three-dimensional topographic effect on the drywall. By leaving small calculated gaps between the padded sections, you introduce deep shadow lines that give the installation incredible depth and character. The fabric choices range from neutral heathered grays to deep, rich jewel tones.
Installing these panels requires heavy-duty adhesive or z-clip hardware to keep them flush against the framing. Because they are lightweight, you can cover massive square footage without worrying about structural load limits. It represents one of the most cost-effective ways to change the entire mood of an entertainment zone.
Idea Ten: Exposed Brick and Industrial Accents
Leaving structural brickwork exposed or applying thin clay veneers gives the space a gritty, urban loft atmosphere. The rough, irregular texture of the masonry contrasts beautifully with the pristine, glossy finish of a modern flat screen. This approach brings immense character and historical weight to otherwise sterile new-construction homes.
Mounting heavy equipment into old, crumbly masonry requires specialized sleeve anchors and carbide-tipped drill bits to prevent the wall from shattering. Running plastic cables across a beautiful historic brick surface ruins the illusion immediately. It looks sloppy and unfinished.
We often fish flexible wires directly through the recessed mortar joints or use raw galvanized steel conduit pipes to turn the messy wiring into an intentional industrial feature. Painting the metal pipes matte black ties them perfectly into the factory-inspired aesthetic while keeping the high-voltage lines safe from interference.
Real Scenario: The Open Concept Challenge
A recent client faced a very difficult layout in a massive open-concept condo in downtown Chicago. The only available surface for the display sat directly between two massive floor-to-ceiling windows overlooking the city skyline. During the day, the intense backlight made the screen completely invisible, and at night, the massive black rectangle felt like a black hole against the vibrant city lights.
Instead of fighting the glass architecture, we built a custom freestanding room divider right in the center of the living space. We clad the room-facing side in slatted walnut wood to warm up the cold concrete floors and integrated a recessed alcove specifically for the equipment. We housed all the messy cables inside the false wall cavity and ran the power through a specialized floor core drill.
This solution fixed the massive glare problem by moving the screen away from the windows entirely. It also created a defined psychological boundary between the dining area and the sitting area without blocking the incredible urban views. The new layout felt purposeful, dividing the cavernous room into intimate, functional zones that actually made sense for daily living.
Wrap Up:
Crafting a beautiful media centre requires balancing heavy electronics with thoughtful spatial planning and material selection. Integrating hidden wire management, correct viewing heights, and proper ambient illumination turns a basic blank wall into a refined architectural element. Applying these concepts ensures your entertainment zone feels deliberate, functional, and perfectly tailored to your daily living patterns.
FAQs Section:
How high should a flat screen be mounted for comfortable viewing?
The center of the display should sit right at eye level when you are seated relaxed on your primary sofa. For most standard furniture dimensions, this places the exact middle of the screen roughly forty-two to forty-eight inches measured directly from the floor.
What is the best way to hide messy cables without cutting drywall?
Paintable cord covers provide a clean, temporary solution that adheres directly to the baseboard or vertical flat surfaces. You can also route thin wires directly behind thick slatted wood panels or snake them inside hollow industrial pipe shelving to mask their appearance completely.
Does placing a television above a functioning fireplace damage the electronics?
Excessive heat drastically shortens the lifespan of delicate internal circuit boards and actively voids many manufacturer warranties. If you must mount your equipment over a hearth, you must install a thick, deep wooden or stone mantel to deflect the rising hot air away from the glass.
Disclaimer:
This content shared by Fall Rugs is solely for research and informational purposes. Fall Rugs is not a professional interior design or home renovation consultancy, and the information provided should not be considered professional advice for home improvement or decor. All ideas and suggestions are based on current trends and general knowledge in the home decor industry.