TL;DR
Place the TV so the center of the screen sits at eye level when seated, allow 1.5 to 2.5 times the diagonal screen distance for viewing, and plan wiring and reflections before mounting. Combine practical placement with an aesthetic treatment built-in niches, media consoles, or framed panels to make the TV feel integrated rather than dominant.
Introduction
A television must be both a functional screen and a considered design element. Many installations sacrifice comfort for looks or vice versa; the goal is placement that supports long viewing sessions while fitting the room’s proportions. This piece lays out practical, numbered placement strategies that cover ergonomics, sightlines, lighting, wiring, built-ins, and real-world trade offs so you can choose what fits your space.
1. Eye‑level placement: the core rule for comfort
Most viewers sit while watching, so center the screen roughly at seated eye height rather than standing height. Measure the distance from the floor to the average seated eye level on your sofa and place the vertical center of the screen at that height. For living rooms where people recline, shift the center slightly lower; for upright dining or kitchen setups, raise it accordingly. This reduces neck strain and keeps contrast and color consistent across long viewing sessions.
Place the screen where the viewer’s sightline is perpendicular to the display as often as possible. Angling the seating toward the TV or using a swivel mount solves slight misalignments but avoid extreme tilt, which worsens reflections and color shifts.
2. Viewing distance: matching screen size to room scale
Viewing distance affects perceived immersion and eye comfort. A useful rule is to allow between 1.5 and 2.5 times the diagonal screen measurement for typical 4K content. For example, a 55-inch screen works well at roughly 6.5 to 11 feet. Larger screens sit closer to the lower end of the range; smaller ones benefit from more distance.
Adjust these figures for content type: movies and cinematic viewing favor closer placement for immersion; casual TV and news benefit from more distance. Also consider room acoustics larger distances may require better speaker placement or a soundbar to preserve clarity.
3. Avoiding glare and reflections
Glare ruins picture quality faster than most realize. Survey natural light at different times of day before fixing the mount. If the TV faces large windows, position it perpendicular to those windows or add treatments like motorized shades or anti‑glare films. For rooms with persistent overhead lighting, choose screens with higher brightness and matte finishes, and place lights to the side rather than directly above the viewing axis.
If relocation is impossible, use a tilted mount and polarizing filters built into some high‑end panels, but remember tilt changes viewer height requirements and can reduce uniformity across the screen.
4. Concealing wiring without sacrificing serviceability
Concealment yields a neat result but leave access for upgrades. Preferred options include in‑wall rated cable kits that keep low voltage wiring tidy, shallow recessed boxes behind the display to house connectors, or routed channels inside a built-in panel. Hardwiring power into the wall is neat but often requires local code compliance and an electrician.
If you rent or want a simpler option, use paintable cable covers run along baseboards or behind furniture. Label cables with heat‑shrink tags where they terminate simple organization saves hours when swapping devices or troubleshooting.
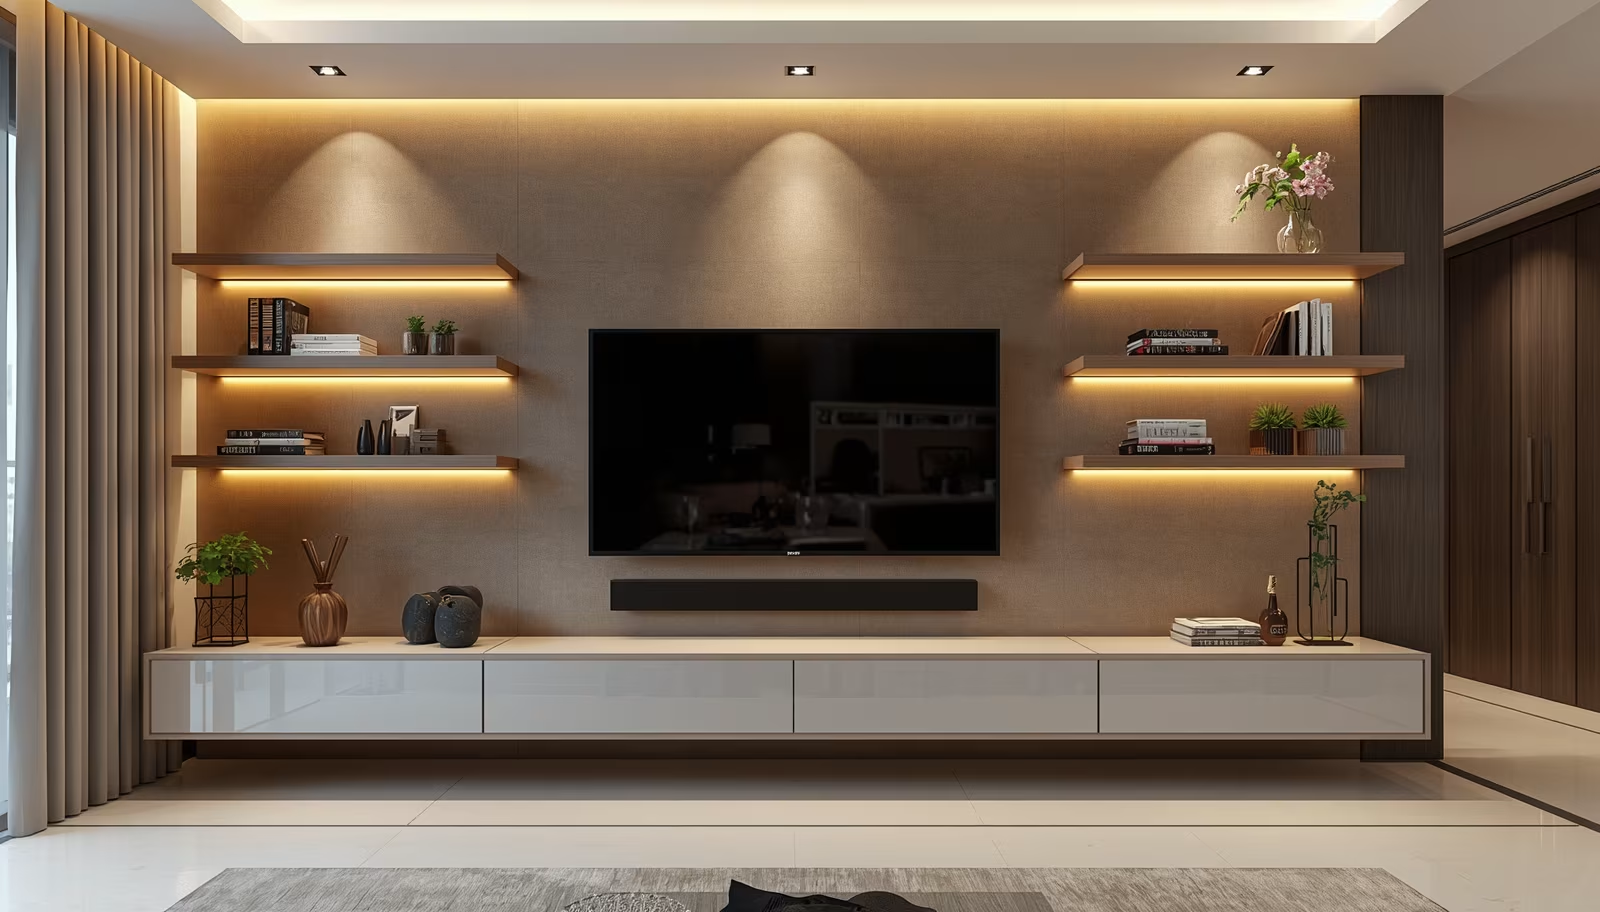
5. Integration with cabinetry and niches
Built‑in niches and media cabinets make the TV look intentional. A flush niche can hide the display slightly recessed to reduce reflections, while a low console under the screen offers storage and electronics ventilation. When designing a niche, leave 2 to 4 inches of clearance around the screen for airflow and allow deeper cavities for full‑sized AV receivers.
Consider shelves or closed doors for remote‑sensitive devices, and design ventilation paths or passive vents to avoid thermal throttling. Note that frameless installations often look cleaner but require precise finishes; use small reveal gaps to ease installation tolerances.
6. Framing the TV as art
Treating the TV like art reduces its visual dominance. Surround panels, picture frames, or a gallery wall make the screen one piece among many. Choose surround materials with low reflectance and colors that complement, not compete with, the screen’s black rectangle. Ambient LED backlighting behind the screen increases perceived contrast and reduces eye strain in dim rooms when configured at low color temperature.
This approach works best in multipurpose living rooms where the TV should recede when not in use and contributes to the overall interior narrative.
7. Placement alternatives: above fireplace and high mounts
Mounting above a fireplace is common but frequently ergonomic trouble. If you must place a TV above a mantel, calculate viewing angles to ensure the tilt required keeps the center of the screen within comfortable sightline ranges. Heat and rising soot are risks; measure temperatures during peak fireplace use and add a spacer or mantel to deflect heat. When the TV sits high, prefer larger screens to compensate for increased vertical viewing angle.
For rooms where wall space is limited, consider ceiling mounts with secure articulations or pop‑up mechanisms inside entertainment furniture. These options demand robust structural support and careful cable routing.
8. Sound considerations tied to placement
A great picture deserves matching audio. Place the TV so you can position speakers at ear level or use a separate center channel speaker in line with the screen. Soundbars are a common, space‑efficient choice; mount them directly below the screen for coherent dialogue localization. If the screen is recessed, ensure there is an unobstructed path for sound or design acoustic openings.
Room placement influences bass response and reflections; corners boost low end while large open rooms may need subwoofer placement trials. Plan speaker stands or mounting points at the same time as your TV placement to avoid later compromises.
9. Cable‑free options and wireless constraints
Wireless HDMI and streaming reduce clutter but come with latency and compression tradeoffs. For critical uses such as console gaming or high‑frame‑rate streaming, prefer wired HDMI with high‑speed cables and a short run to minimize lag. For media streaming and casual viewing, wireless devices work well if the network has consistent bandwidth and minimal interference.
Power remains a requirement. If you aim for a “cable‑free” look, conceal the power lead in the wall using approved in‑wall kits or hide it behind a judgmentally placed console.
10. Accessibility and future upgrades
Plan for serviceability. Leave enough clearance above, below, and to the sides for replacing the TV or accessing ports. Track the locations of wall studs and available junction boxes during installation. If you plan to upgrade screen size in a few years, choose a mount and wall reinforcement that survive a larger panel.
Document the install with a short schematic photo and note of stud locations and cable runs. Those photos save time for future installers or when selling the home.
Real example: townhouse living room retrofit
A Karachi townhouse client replaced an old sideboard and mounted a 65‑inch TV onto a newly built panel wall. The installer set the center of the screen at 42 inches from the floor, which matched the household’s sofa height. They recessed the TV by 1.5 inches to reduce glare, added a ventilated cavity behind the panel for an AV receiver, and routed power with a code‑approved in‑wall kit. The result reduced neck strain complaints and made the TV a calm focal point in a narrow room.
Real example: open plan kitchen and family area
In an open plan flat, a family wanted a single screen viewable from the kitchen counter and the adjacent lounge. The solution mounted the TV on an articulating arm at a slightly higher centerline so it could tilt down for the sofa or swivel toward the counter. They paired a wireless soundbar and prioritized wired HDMI for the gaming console. The mixed setup balanced visibility, minimized glare, and preserved the flat surface of the kitchen wall.
When a method fails: common mistakes and how to recover
A frequent error is prioritizing symmetry over sightlines, leading to a perfectly centered TV that forces viewers to tilt their necks. Fix this by shifting seating or using mounts with horizontal adjustment. Another mistake is inadequate ventilation in enclosed cabinets; electronic devices can degrade faster under heat. Retrofit passive vents or a quiet fan system and test temperatures under load before finalizing cabinetry.
Overcommitting to concealment can also hamper upgrades. If you find cables inaccessible later, add removable panels or install access plates to keep the finish clean yet serviceable.
Material and finish choices that matter
Matte paints and low‑reflectance textiles around the screen reduce distraction. Solid wood consoles work well but include nonobtrusive ventilation slots. Metal or glass surfaces near the screen increase reflections and should be minimized. Pick finishes that absorb light adjacent to the screen to preserve contrast and avoid bright patterns that pull attention away from the picture.
Planning checklist before you mount
Before drilling, measure seated eye height, compute viewing distance relative to screen size, map light sources throughout the day, locate studs and electrical runs, and plan for ventilation and cable management. Confirm mount weight ratings and ensure the installer has the right anchors for your wall type, whether drywall over studs, concrete, or brick. A short planning list like this prevents costly reworks.
Wrap Up:
Balanced TV placement demands both ergonomic calculation and design intention. Prioritize seated eye height and correct viewing distance, deal with reflections and wiring early, and treat the TV as a room element rather than an afterthought. Small planning choices clearance, ventilation, and accessible cabling produce long‑term benefits for comfort and future upgrades.
FAQs
Q1: What is the ideal height to mount a TV on the wall?
A1: Aim to place the vertical center of the screen at seated eye level; that commonly falls between 40 and 48 inches from the floor, depending on sofa height and typical posture.
Q2: How far should I mount my TV from seating?
A2: Use roughly 1.5 to 2.5 times the screen diagonal for viewing distance, leaning closer for cinematic content and farther for casual watching.
Q3: Can I hide the TV cables without violating codes?
A3: Yes, use in‑wall rated cable kits or install conduit and junction boxes that meet local electrical codes; for temporary solutions, paintable surface channels work without wall work.
Disclaimer:
This content shared by Fall Rugs is solely for research and informational purposes. Fall Rugs is not a professional interior design or home renovation consultancy, and the information provided should not be considered professional advice for home improvement or decor. All ideas and suggestions are based on current trends and general knowledge in the home decor industry.