
TL;DR
Fixing wall damage requires selecting the right compound and backing material based on the size of the opening. Small nail holes need lightweight spackle, while large breaks require a wire mesh patch or a new piece of sheetrock. Proper sanding and matching the original paint texture ensure a completely invisible repair.
Introduction
How many times have you looked at a dent in your plaster or drywall and wondered if you could fix it yourself without making a bigger mess? Dents, deep scuffs, and accidental punctures happen constantly in busy homes during furniture moves or busy weekend gatherings. Fixing these spots is much simpler than most home owners realize when using the correct supplies and patience. You will learn the exact steps to repair small nail dings, medium door knob indentations, and large structural gaps with professional results.
Matching Wall Repair Materials to Hole Size
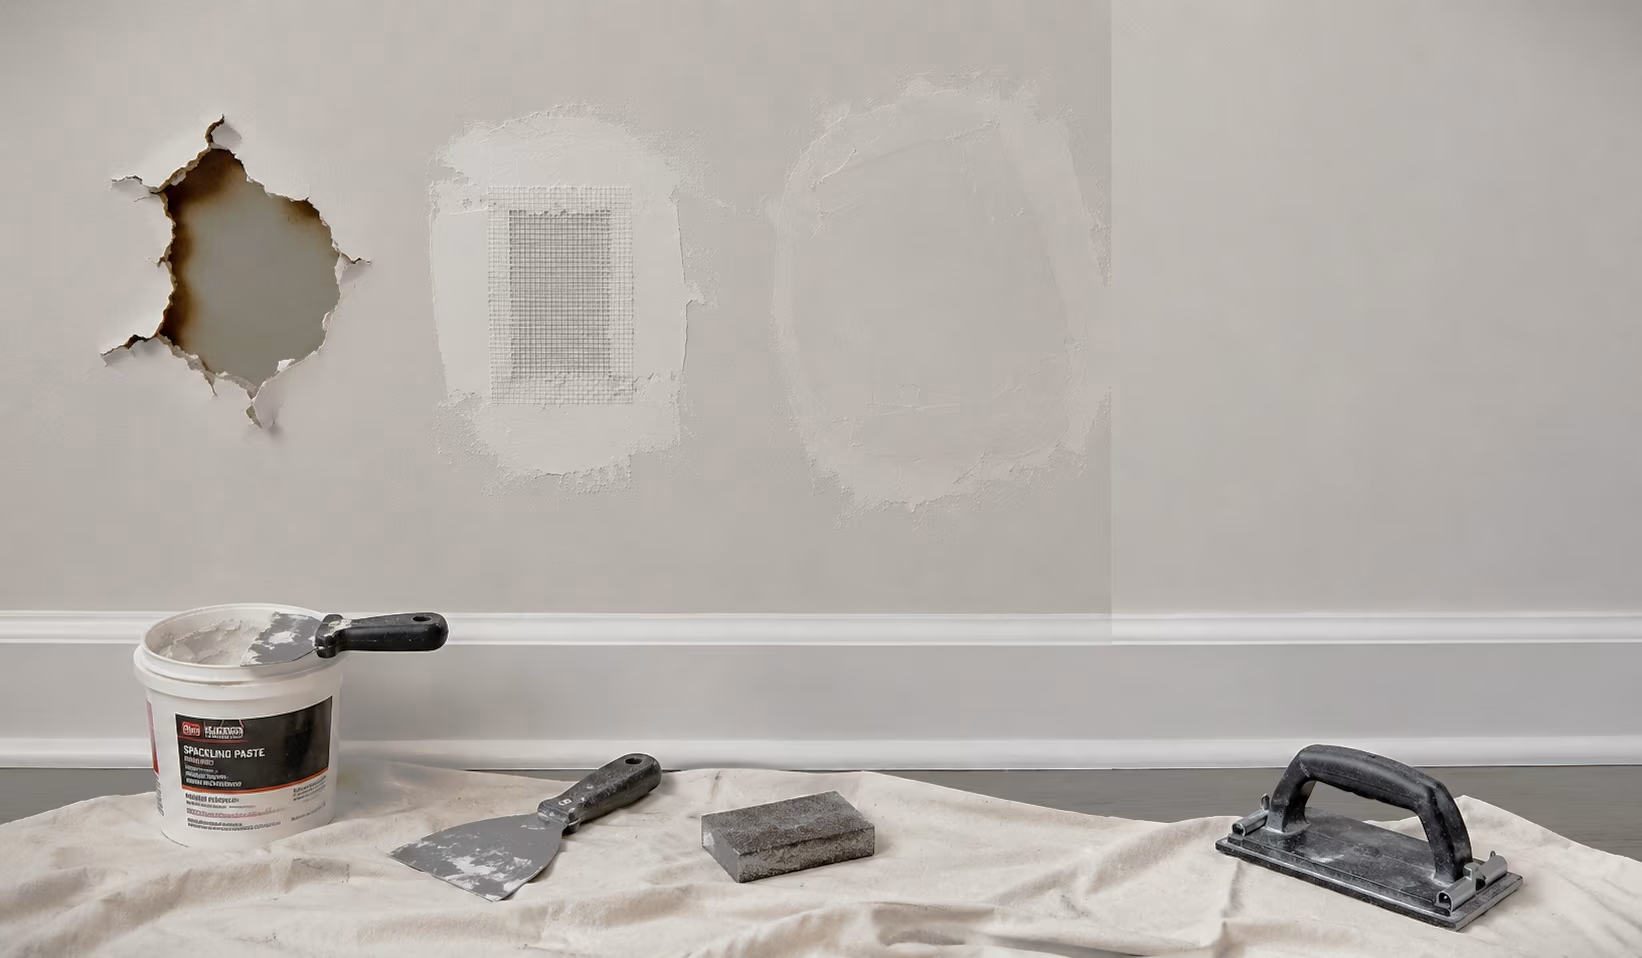
Small nail pinholes, medium knob dents, and large doorknob punctures require distinct structural approaches. Using basic spackle on a wide gap will cause the material to slump, shrink, and crack within hours. Matching your repair strategy to the actual dimensions of the damage saves time and prevents repeated attempts.
- Small dings under one inch need lightweight joint compound or fast-drying spackle applied with a putty knife.
- Medium damage between one and four inches requires a self-adhesive mesh patch or aluminum backing sheet for reinforcement.
- Large breaks exceeding four inches demand backing wood strips, cut sheetrock, and paper drywall tape.
- Deep plaster voids require setting-type compound, often called hot mud, which hardens through chemical reactions rather than evaporation.
A tenant in a Chicago apartment attempted to fill a three-inch doorknob hole using standard DAP vinyl spackle alone without mesh backing. The wet compound fell inside the wall cavity three times before drying into a sunken, cracked dish. Switching to a four-inch door-shield mesh patch from Home Depot solved the issue instantly, creating a sturdy bridge that held two thin coats of joint compound perfectly flat.
+-------------------+----------------------+-----------------------+-----------------------+
| Hole Size         | Primary Material     | Key Tool              | Drying Time           |
+-------------------+----------------------+-----------------------+-----------------------+
| Under 1 inch      | Lightweight Spackle  | 2-inch Putty Knife    | 1 to 2 hours          |
| 1 to 4 inches     | Mesh Screen Patch    | 4-inch Taping Knife   | 4 to 8 hours          |
| Over 4 inches     | Drywall & Wood Strips| 6-inch Taping Knife   | 12 to 24 hours        |
+-------------------+----------------------+-----------------------+-----------------------+
Fixing Small Dings, Nails, and Screw Holes
Small punctures from picture hangers, wall anchors, or stray screws represent the most common wall damage in residential rooms. These small voids do not need heavy backing or wire screens. However, cleaning away loose paper fibers before applying material remains critical for a flat finish.
- Remove existing anchors using needle-nose pliers or drive them slightly below the surface with a screwdriver.
- Scrape away raised drywall paper edges around the perimeter using a sharp utility knife or putty scraper.
- Press a small dab of lightweight spackle into the opening using a flexible two-inch putty knife.
- Wipe the knife flat across the wall surface at a forty-five degree angle to clear excess material.
Handling Paper Tears and Fuzz
Drywall face paper often shreds when anchors pull out forcibly. Applying joint compound directly over torn paper causes the paper to bubble as it absorbs water from the paste. Scraping back loose fibers and sealing the exposed gypsum core with an oil-based primer like Zinsser Cover-Stain prevents unsightly surface bubbles.
During a nursery refresh in Austin, Texas, picture hangers pulled loose bits of face paper from the wall. The installer sanded the edges, sealed the exposed paper core with shellac primer, applied two coats of 3M PatchPlus Primer compound, and sanded the surface smooth in less than two hours.
Repairing Medium Holes Caused by Door Knobs and Furniture
Medium gaps measuring two to four inches often occur when door handles hit unbuffered drywall or heavy furniture corners slam into corridors. These voids are too wide for compound alone because the paste lacks internal strength across open space. Self-adhesive aluminum or fiberglass mesh screens supply the structural bridge needed for this task.
- Clean the wall around the outer perimeter using a damp cloth to eliminate dust and drywall chalk.
- Stick a self-adhesive aluminum patch directly over the void, extending at least one inch past every edge.
- Spread a thin layer of pre-mixed joint compound across the mesh using a four-inch flexible taping knife.
- Feather the outer edges outward by three to four inches to taper the patch thickness seamlessly into the wall.
- Allow the first coat to dry for six hours before applying a second skim coat.
A homeowner in Seattle installed a heavy Ruggable runner rug and accidentally backed a oak sideboard into the hallway wall, creating a three-inch cavity. Using a Gorilla Heavy Duty mesh kit, they bridged the opening cleanly. By extending the compound edge four inches past the mesh boundary, the repair became invisible once painted with Sherwin-Williams Duration flat paint.
Rebuilding Large Holes with Cut Sheetrock and Wood Backing
When damage exceeds five inches across, mesh patches flex too much under pressure. Large openings demand a rigid drywall repair plug screwed directly into wooden support cleats mounted inside the wall cavity.
- Cut the damaged section into a clean square or rectangle using a drywall hand saw and utility knife.
- Insert two pine wood backing strips into the wall opening, extending three inches past the top and bottom cuts.
- Drive one-and-a-quarter-inch drywall screws through the solid wall into the wood backing strips to secure them.
- Measure and cut a piece of new sheetrock from USG Sheetrock brand paneling to fit the newly squared opening.
- Screw the new patch panel directly into the wood backing strips until the screw heads rest just below the paper surface.
- Cover all four outer seams with paper tape embedded in a layer of all-purpose joint compound.
A property manager in Denver faced a nine-inch plumbing access hole cut into a living room wall. They secured two pine furring strips behind the sheetrock using coarse-thread drywall screws. After inserting a matching nine-inch drywall plug, they taped the joints with mesh tape and applied two thin coats of joint compound, completely restoring the original wall structure.
Securing Wood Cleats Properly
When mounting internal wood cleats, hold the wood strip tightly against the back side of the intact drywall. Drive drywall screws through the original wall face into the wood cleat, countersinking the screw heads slightly below the surface. This creates a solid frame that prevents the new patch panel from moving or cracking in the future.
Sanding, Texturing, and Painting for an Invisible Finish
Applying compound correctly is only half the effort. Achieving a professional repair requires careful sanding, matching the original surface texture, and priming before applying topcoat paint. Skipping primer leads to flashing, a condition where the repaired spot looks shiny or dull compared to the surrounding wall.
- Sand the dried compound using 120-grit sandpaper for initial leveling, followed by 220-grit for smooth edges.
- Feather the edges using light circular motions to eliminate hard ridges between the patch and the existing paint.
- Replicate wall texture using spray cans like Homax Orange Peel texture or a coarse sponge for knock-down finishes.
- Coat the sanded patch with a dedicated drywall primer like KILZ PVA drywall sealer before applying paint.
- Paint the spot using the original roller sleeve style to match the stipple pattern of the existing wall.
An interior decorator updating a West Elm showroom display in Atlanta corrected a poorly finished six-inch patch. The original repair was visible because the previous technician painted directly over raw compound without priming. The decorator sanded the edges smooth with 220-grit sanding blocks, applied PVA primer, matched the orange peel texture with a spray can, and applied two coats of Benjamin Moore Regal Select matte finish. The repair blended into the wall completely.
Wrap Up
Fixing holes in drywall is a simple process once you select the right materials for the job size. Small pinholes require only a quick dab of lightweight spackle, while larger damage needs mesh reinforcement or wood backing strips. Taking time to feather compound edges, sand smooth, and apply primer before painting ensures a durable finish that hides all traces of past wall damage.
FAQs Section
How long does spackle or joint compound take to dry before sanding?
Lightweight spackle dries in one to two hours, while standard pre-mixed joint compound takes four to twenty-four hours depending on temperature and layer thickness. Always wait until the compound turns completely bright white before sanding.
Why does my wall patch look different after painting it?
Unprimed joint compound absorbs paint differently than surrounding painted paper, creating a flat or glossy spot called flashing. Applying a coat of PVA drywall primer over the patch seals the surface so the topcoat matches evenly.
Can I fix a hole in the wall without cutting sheetrock?
Holes under four inches can be repaired easily using self-adhesive mesh patches without cutting out large pieces of sheetrock. Voids larger than four or five inches require a solid drywall plug and wood backing to prevent the patch from cracking when pressed.
Disclaimer
This content shared by Fall Rugs is solely for research and informational purposes. Fall Rugs is not a professional interior design or home renovation consultancy, and the information provided should not be considered professional advice for home improvement or decor. All ideas and suggestions are based on current trends and general knowledge in the home decor industry.